Low Temperature Heating
As we approach autumn and we think about turning our heating back on after the summer I thought it would be useful to relay some what I have learnt about Low Temperature Heating.
I have written this post after trying to get my head around this topic for the past 9-12 months. Hopefully I have a basic grasp of things now so that I can relay it to other end consumers (like me) in a simple way.
Many thanks to the many people listed in this article who have provided the inspiration and the knowledge for me to pull this together.
If there are any errors or misguided assumptions within the article please do let me know. I’m just an IT geek, not a heating engineer!! So my approach will be to try and keep this as simple as possible.
UPDATE: This document feeds nicely into the newer What Size Heat Pump blog article that goes through my journey from combi boiler to heat pump and explains how to calculate house/room heat loss.
First up, low temperature heating is not simply turning your room thermostat down from 21 to 19 degrees.
Low temperature heating actually relates to the temperature of the water that flows around your radiators (or under floor heating).
Direct from the factory many Combi Boilers are set to heat the water within your central heating system and radiators at around 70 degrees celsius.
The problem with this practice is that condensing combi boilers do not condense at 70 degrees and as such are not as efficient as they could be. Ie, they use more gas than they could, which costs you more money than it should and we create more emission than we’d like.
Also, some heating engineers have been known to leave the combi boiler at these default settings when installing the boiler in your home.
This document hopes to explain why you might want to think about checking your own combi and potentially making a change to lower the water temperature.
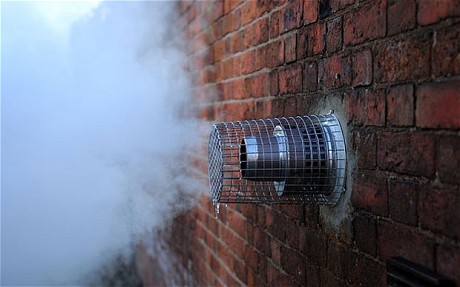
If you see your combi boiler billowing out large amounts of white steam from the vent when the heating is on there is a chance your boiler isn’t condensing. This is not always the case, but it might be a red flag to begin investigations.
So why do manufacturers send them out of the factory at 70 degrees?
Setting the boiler at this high water temperature means there is little thought required around central heating design.
If things are left set at 70 degrees, the boiler will shoot red hot water around the radiators and in all likelihood the home owner will have no issues heating their house because there is so much heat.
To get your combi to condense and become more efficient you need temperatures down around and below 50/55 degrees return water temperature as you can see from the graph below
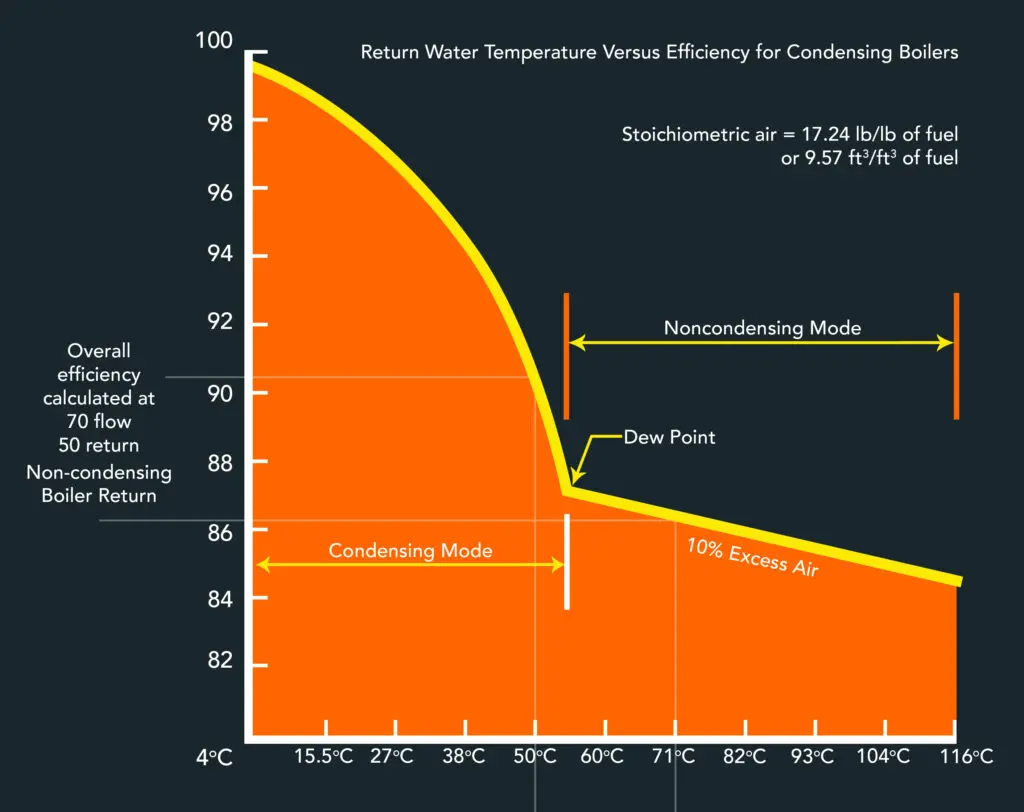
The above graph was lifted from this excellent article by Heat Geek.
When you reduce the water temperature and the boiler condenses it becomes more efficient. This uses less gas and saves you money. Good for the environment and good for you.
By reducing the ‘return temperature’ you could increase the efficiency of the boiler to over 90%.
ie one unit of Gas in, 0.9 unit of heat out.
For comparison, well designed heat pump systems can be 300% to 400% efficient (1 unit of electricity in, 3 to 4 units of heat out)
A nationwide wastage problem that needs addressing
With a reported 25 million gas boilers installed in UK homes, imagine how much gas we would not need to burn each year if we started saving 5% to 10% on the combi boilers that are poorly installed in homes right now?
Yes, heat pumps and other forms of electrification of heat and hot water are the ultimate and perhaps longer term goal, but surely there is a lot of lower hanging fruit out there in combi boiler land?
Flow and Return
You will see the terms ‘flow’ and ‘return’ mentioned a lot in reference to heating.
- Flow – The water that has just been heated and has exited your heat source (Combi or Heat Pump) and makes its way to your radiators (or underfloor heating).
- Return – The water that has gone around your heating loop (radiators/ufh etc) and comes back into your heat source.
Out of the box, your boiler might have the flow set at 70 degrees and once the water has gone all around your heating system it might return at 60 degrees (having lost some heat on the way around).
But you might choose to change that, so the flow out is 60 degrees and the return back comes in at 50 degrees.
By reducing the temperature of the water within your radiators, this doesn’t mean we change anything on your room thermostats, they would stay at 20 degrees or whatever you have them set at.
Flow and Return only describes the water temperature coming out of the boiler (or heat pump), going around the pipework and radiators then coming back to your heat source.
Heating System Design
In a properly designed heating system, be that for a combi boiler or a heat pump, the installer should undertake a full house, room by room sizing analysis.
This heating system design would involve calculating the heat loss of each room (in watts), based on the insulation and make up of the house (also known as the fabric) and in turn recommend radiator sizings for each room based on, and to match the heat loss for each room.
A full design would also provide a whole house heating demand (in kW), which can be used to correctly size the heating side of a combi boiler or heat pump.
This is why ‘design’ is the key to a properly sized heating system (combi or heat pump).
Radiator Types
The amount of heat a radiator can emit (calculated in watts) is hugely influenced by the temperature of the water in it.
Also, the amount of surface area on a radiator dictates how much heat it can emit. The larger the surface area the higher the heat output.
So there is a sliding scale of heat output which depends on both the radiator size and the water temperature within the radiator.
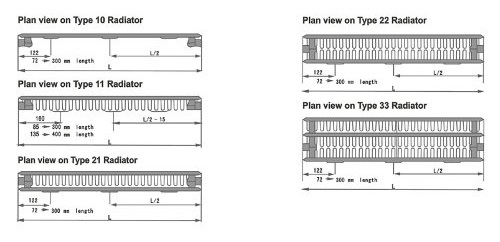
This can get a bit complicated as there are a few different types of standard looking radiators available.
- P1 also known as Type 10. (1 radiator panel and no convection fins)
- K1 also known as Type 11. (1 radiator panel and 1 set of convection fins)
- P+ also known as Type 21. (2 radiator panels and 1 set of convection fins)
- K2 also known as Type 22. (2 radiator panels and 2 sets of convection fins)
- K3 also known as Type 33. (3 radiator panels and 3 sets of convection fins)
The chart below shows the heat output rating (in watts) for each of the various types of a 1400 wide x 600 high size radiator at different water temperatures (chart created using from figures taken from heat-engineer.com) when heating a room to 21C.
Note: I have put a simplified version of the chart here. Behind the scenes the calculations take into a lot of factors, most of which make my head fry!! Like I said earlier, I’m trying to keep this simple.
Note: Larger or smaller radiators (than 1400 x 600) will obviously have different outputs depending on their size.
ie a 1000 x 400 will output less heat than a 1600 x 700 will.
Output in watts of 1400 x 600 radiator types at various water temperatures
| Type | 35C | 40C | 45C | 50C | 55C | 60C | 70C |
| P1 (type 10) | 185W | 275W | 372W | 476W | 585W | 699W | 966W |
| K1 (type 11) | 257W | 382W | 518W | 662W | 814W | 973W | 1344W |
| P+ (type 21) | 388W | 577W | 782W | 1000W | 1230W | 1470W | 2030W |
| K2 (type 22) | 471W | 700W | 949W | 1214W | 1492W | 1784W | 2464W |
| K3 (type 33) | 637W | 947W | 1283W | 1641W | 2018W | 2412W | 3332W |
To reiterate: the size of the radiator and the temperature of the water within the radiator has a big effect on how much heat it can generate and output in the room.
Heating our dining room
So let’s imagine we want to look at heating our dining room.
The heating engineer has been and completed their heat loss calculations and the room has come out with a heat loss of 805 watts.
Note: This heat loss calculation in watts is what your room will lose on the worst case day, which for calculation purposes is normally around -3 degrees outside, this is known as the design temperature (DT).
This worst case/design/DT value can vary between -1 and -4 depending where you are in the UK. Heat loss calculations are discussed later on in the article.
For this explanation we are going to say the radiator in this dining room is currently a K1 (type 11) (1 radiator panel and 1 set of convection fins).
In our imaginary house the combi boiler is at default settings. So the flow temperature is 70 degrees and the return is coming back at 60 degrees. So looking at the chart above you can see that the K1 rad setup will output 973 watts.
Which is easily enough to heat the room even on the coldest days (heat loss is 805 watts at -3).
Hopefully you begin to see why combi boilers are left at 70 degrees. Everyone is covering their backsides. Radiators can pump out lots of heat at 70 degrees flow and 60 return. Usually way more than is actually required for the room.
But if we now try to make the boiler condense and be more efficient by dropping flow to 60 and return to 50, then we instantly hit some problems as the K1 radiator can only output 662 watts at 50 degrees whilst the heat loss of the dining room is still 805 watts (when -3 degrees).
This is the reason why you might see it mentioned that you may need to swap out some older radiators for bigger ones when installing a heat pump. This is because heat pumps work best and are most efficient at lower flow/return temperatures (usually around 35 to 45 degrees). So you would need radiator types that can output more heat at lower temps or indeed underfloor heating which can work well at 30 degrees.
So in our dining room example where we are dropping temperature to 60 degrees flow / 50 degrees return, you could keep the same radiator dimensions (1400 x 600) and just go up to a K2 type for example. The K2 rad gives out 1214 watts at 50 degrees which easily covers the 805 watts heat loss of the room.
A straight swap of the same size radiator is likely to cause the least disruption as it is unlikely that any pipework would need changing. You’re just hanging a new rad of the same height and width in the same place.
Fabric First
The other alternative to bigger radiators is better insulation. If you can reduce the heat loss in the room then you may not need as big a radiator or indeed you may be able to keep the existing one.
You might hear’ fabric first’ mentioned a lot. Because tackling the insulation in your house first could mean you don’t have to change any radiators at all.
By tackling the insulation you might be able to reduce the heat loss in the room from 805 watts down to to say 650 watts. So the whole design implications of radiator sizing, flow/return temperatures and efficiency swing in your favour.
Sorting out the insulation will help no matter what heat source you have now or will have in the future. So it is worth some time and effort to see what improvements you could make.
Later in the article we talk about who best to contact about insulation.
So what about trying to get down to 40 degrees temperature?
Why mention 40 degrees? As mentioned above, heat pumps work best at lower temperatures. So you’d likely need around 40 to 45 degree water in your rads to ensure a high COP (coefficient of performance) with a heat pump.
Heat pumps aren’t anywhere near as efficient when trying to replicate combi boilers with 50 and 60+ degree heat.
So if you are already replacing that K1 radiator in the example above to try and get your combi boiler to condense at 50 degrees, why not install a radiator that means you are heat pump ready in the future? Make the change once, not have to do it again later down the line?
Remember, the heat loss of the room is still 805 watts at -3 outside. The target flow and return temperatures don’t change that.
If you wanted a single radiator in the dining room which had enough output at 40 degrees then you’d need a big K3 radiator which could output 947 watts.
Alternatively, you could add a second radiator to the room so that the combined output of both rads matches or exceeds the 805 watts requirement.
Hope all that makes sense?
Basically, size the radiators to a few things:
- To at least (or beyond) the calculated heat loss of the room
- The target return temperature of your heating system
- Potentially think ahead to future lower temperature heating (like a heat pump)
How to calculate heat loss
All heat loss calculations take into account where you are located in the UK and the elevation of your property as these have an impact on the outdoor temperatures you may see throughout the year.
https://www.heat-engineer.com/ offer a simple free heat loss estimator, which can be a good starting point to get a whole house estimate.
To get more accurate results you really need to know the complete make up of your property. The size of your rooms, the individual materials used, the specifics of the insulation and windows etc.
Every building element in your house has a different U value (its insulation property); so floors, outside walls, make up of any cavities, party walls, window specification, under floors, doors, ceilings, roof insulation etc etc.
Ie, A triple glazed window has a lower U value (better insulator) than a double glazed unit.
In the same way a cavity wall that is insulated can retain more heat than a solid brick wall.
If you know all this information then there are a few ways to go about calculating the room by room values yourself.
MCS Calculator Spreadsheet
This free spreadsheet allows you to enter all the known elements of your house and will provide room by room heat loss calculations. You can also enter current radiator types and sizes and it will tell you whether they are big enough for the target flow rate you have chosen against the calculated heat losses per room.
Heat Engineer One Off Survey
https://www.heat-engineer.com/pricing
For just £12 you can do a complete web-based home survey using a similar method to the MCS calculator.
As with MCS, you do need to know the make up of the materials used in your house.
Having completed both MCS and Heat Engineer myself, the heat engineer website method is a little more user friendly with it being a web based tool than a spreadsheet.
Getting someone to do a heat loss calculation for you
But what if you don’t know anything about your home’s fabric and insulation?
Then you’d need to find a heating engineer or energy service with the skills to do this for you.
There is a growing band of heating engineers that are driven to ensure they are installing efficient heating systems based upon home surveys and heat loss calculations.
Whilst a room by room home heat loss calculator survey is now mandatory before a heat pump system can be designed and installed, not all heating engineers that fit combi boilers bother to do this.
So finding the right person is key here otherwise you could end up with an out of the box 70 degree combi boiler installation.
The Heat Geek website offers heating design courses to engineers.
Engineers that have then taken the course and achieve the required certification are then listed on their ‘find a heat geek’ page.
https://www.heatgeek.com/find-a-heat-geek/
So you can have confidence that these engineers understand the concepts of heating system design.

Twitter Recommendations
I would also recommend you follow these accounts on Twitter.
- @_heatgeek – https://www.heatgeek.com/
- @heatcalculation – http://www.heat-engineer.com/
- @kenbone44 – http://www.renewable-heat.co.uk/
- @Damon_BPH – http://www.blakemoreplumbingandheating.co.uk/
- @betateachpod – buzzsprout.com/509671
- @Your_Energy_YW – https://www.yourenergyyourway.co.uk/
- @Si_Poskett – https://twitter.com/Si_Poskett
- @JeremyClimas – https://midsummerwholesale.co.uk/
- @trystanlea – https://trystanlea.org.uk/
All of whom regularly talk about and are passionate about what is commonly called the wastage crisis. Ie, wasting gas by not running combi boilers as efficiently as they could be.
Many of them are also champions of heating with renewables and fabric first insulation, so they are a good bunch of folk to follow if you’re interested in knowing more about heat pumps and insulation.
I would also recommend following and talking to these retrofit people and organisations.
- Nick Parsons – http://syec.co.uk/sustainable/
- Ricard Shears (@richardshears) – https://theretrofithub.co.uk/
- Carbon Coop (@carboncoop) – https://carbon.coop/about
I had a whole house survey done by Nick Parsons. This multi-page report gave me a detailed breakdown of all the U values of the insulation used in our house. This then allowed me to create my own heat loss calculations.
The report he created has been the platform for lots of other investigations and knowledge I’ve acquired later down the line.
I can highly recommend speaking to someone like Nick if you’re interested in learning more about how the insulation in your home performs.
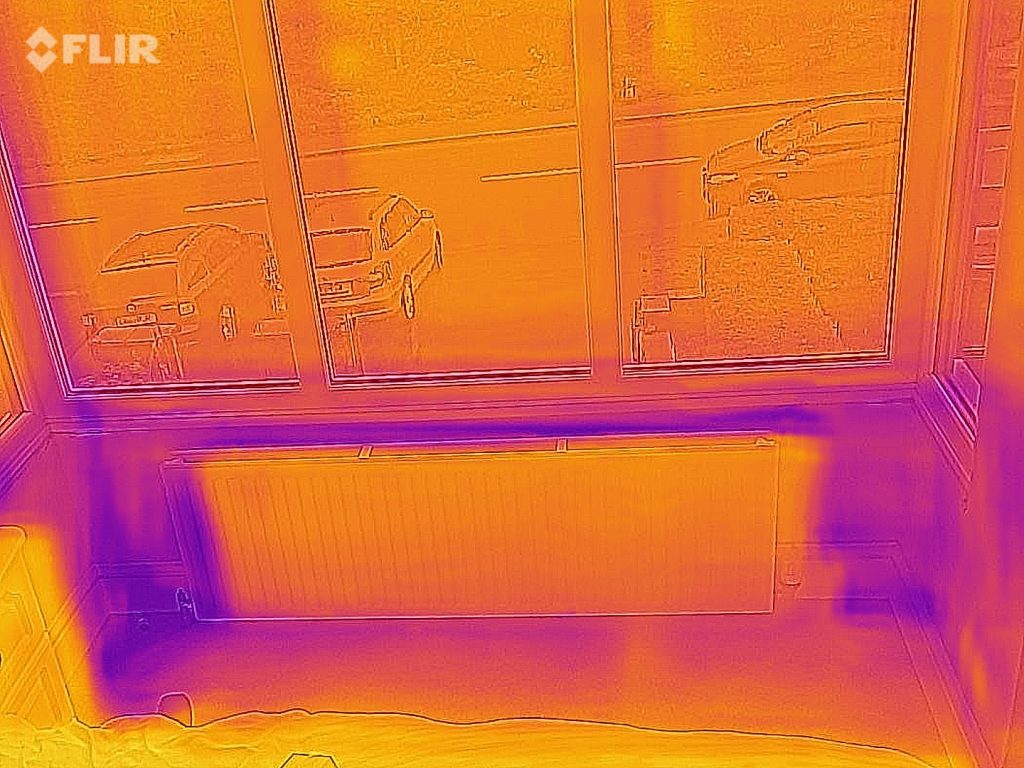
You may also find some quick ‘fabric first’ wins like the bay window Nick alerted me to, which was confirmed by the FLIR camera loaned to me by Octopus Energy.
What temperature is your combi boiler set to right now?
Obviously, the long term future (in my opinion) has to be a life without gas. But if you’re not in a position to rip out the combi boiler just yet, then maybe you could make a few tweaks and stop some of the gas wastage yourself. Whilst at the same time potentially saving some money along the way.
Take a look at what your combi boiler is set to now and consider trying to drop the temperature a little.
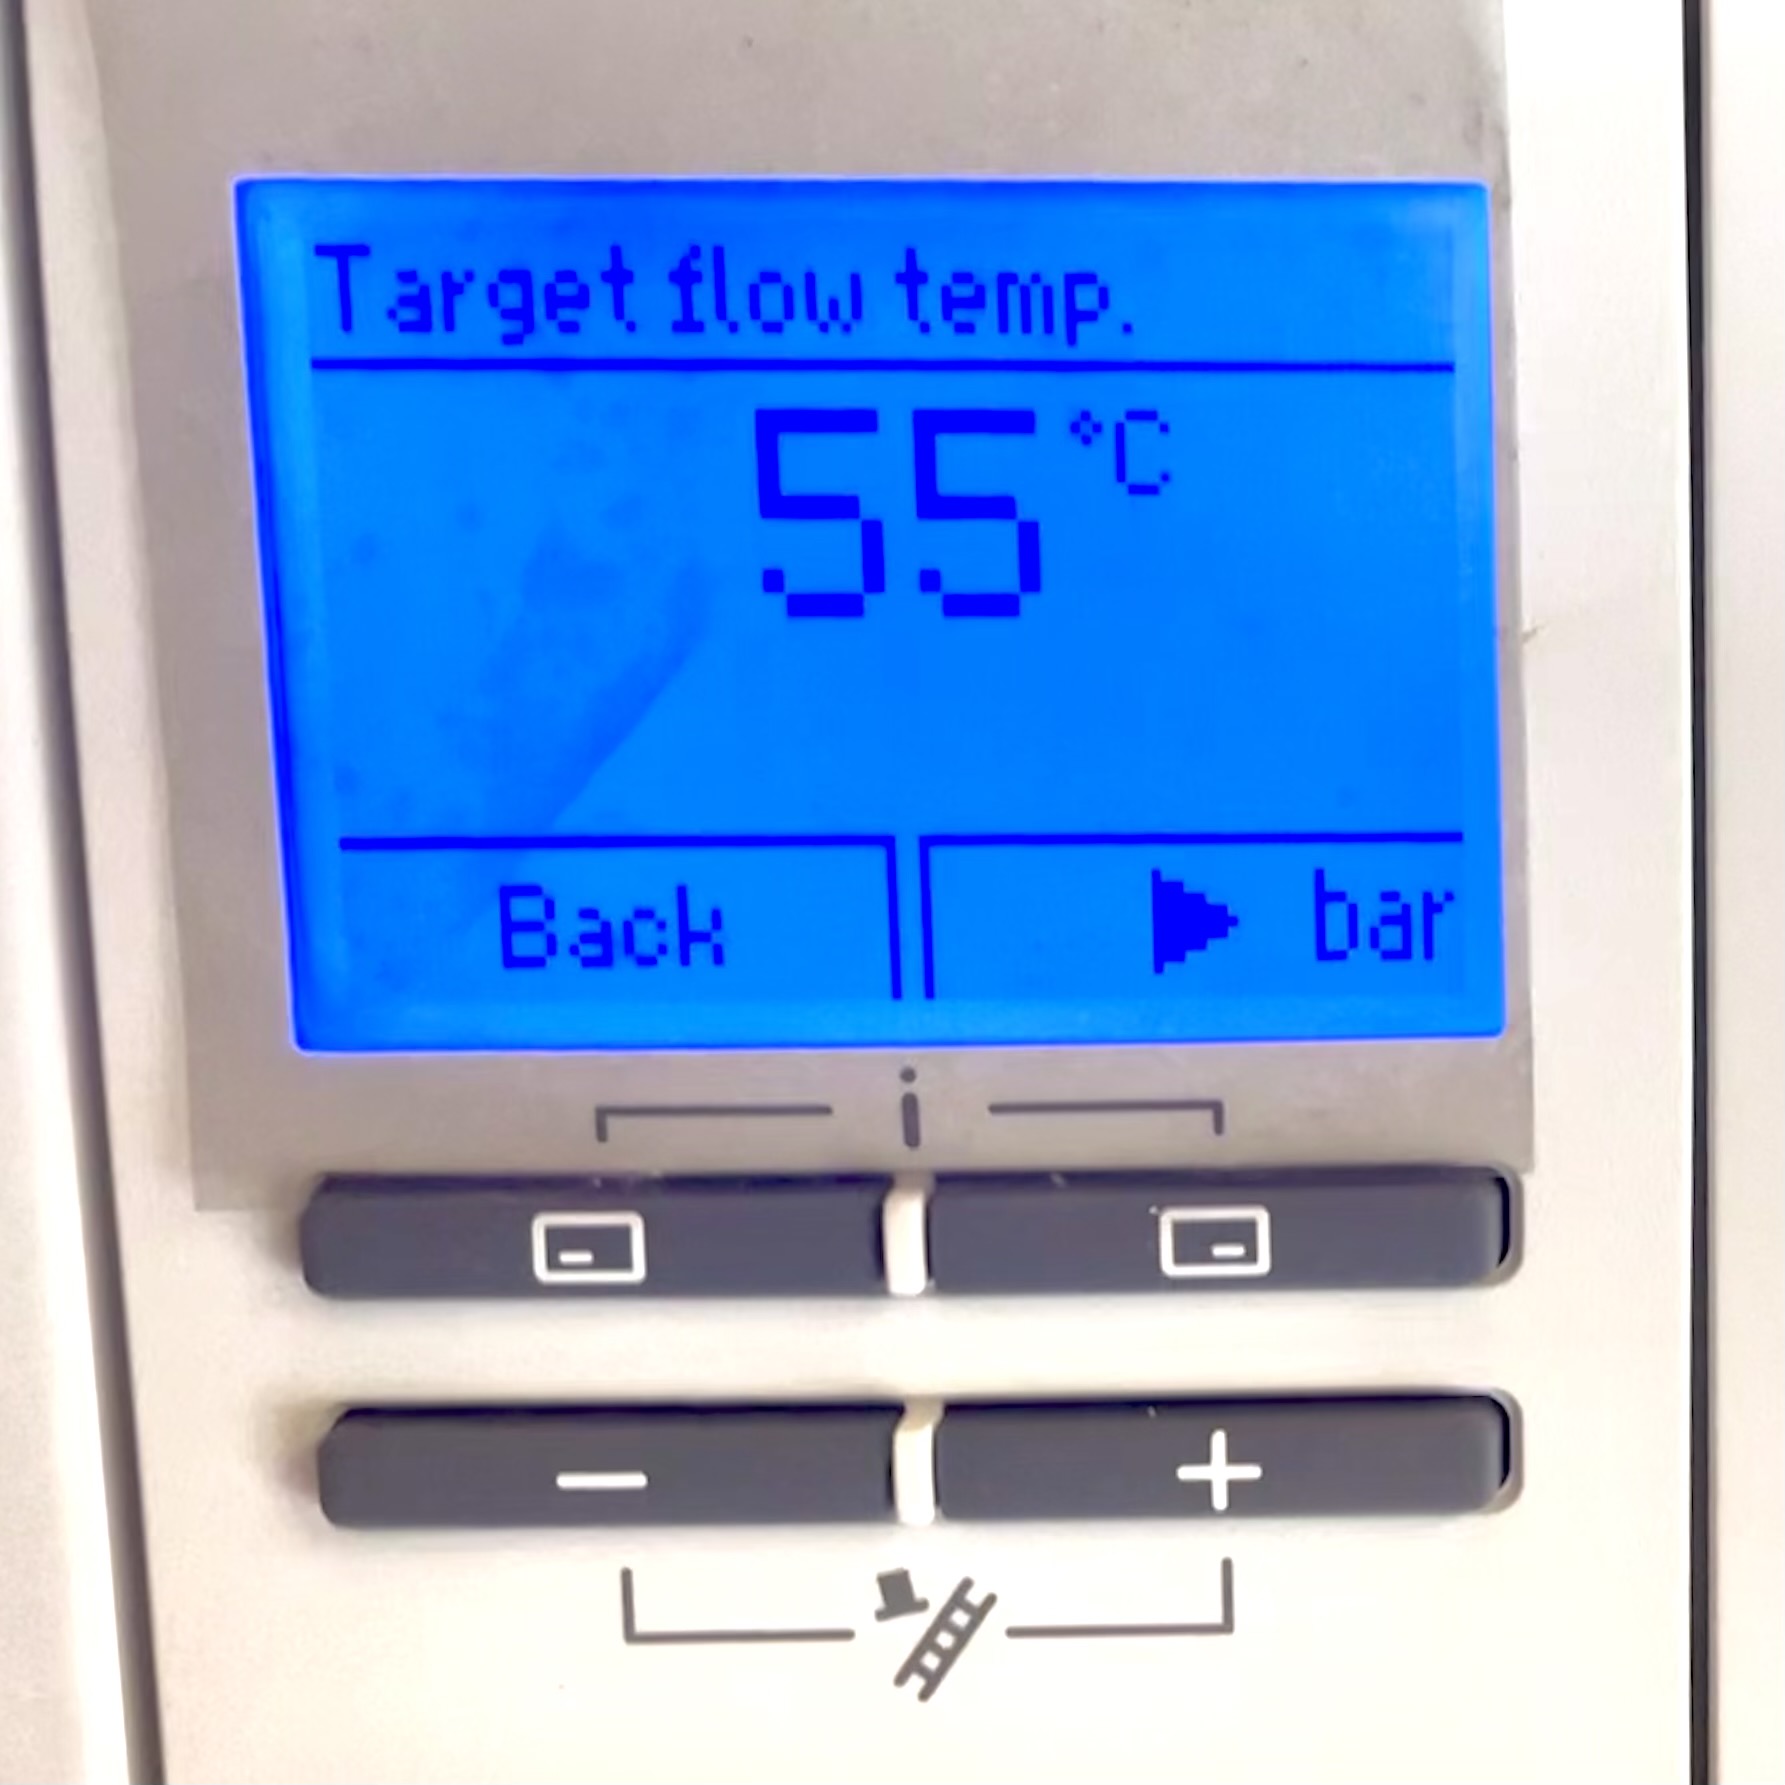
The controls might be a dial, it might be a screen.
Here’s a photo of the front panel of my 6 year old Vaillant Ecotec.
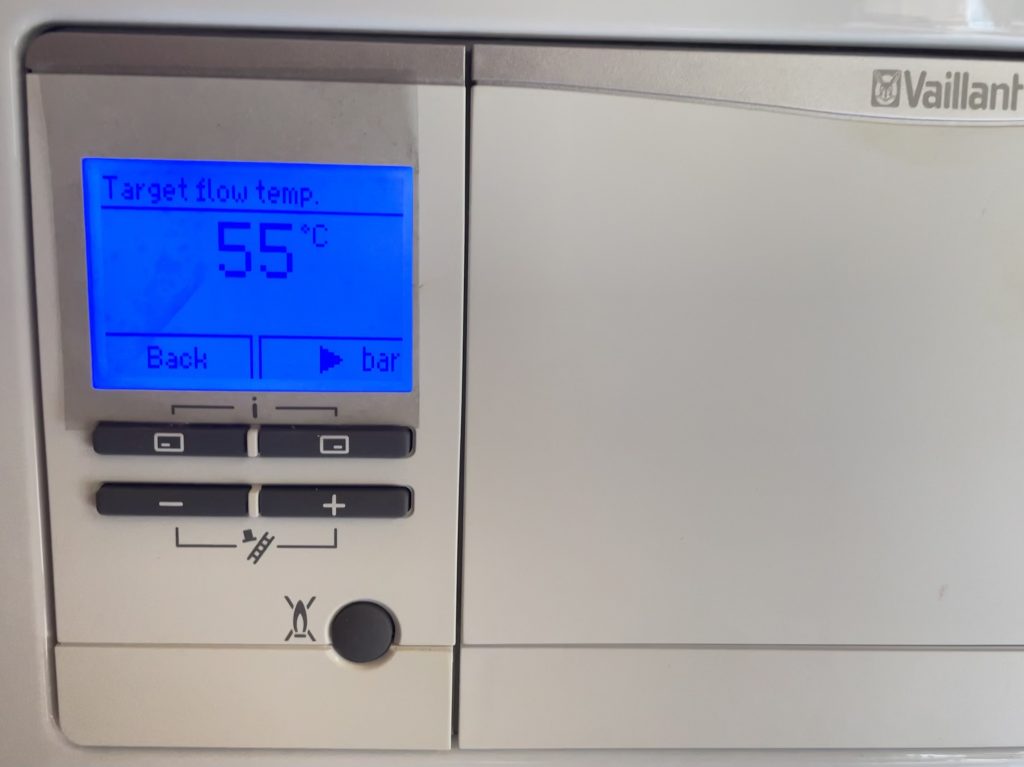
I can easily change both hot water and heating temperature independently using the controls there.
Get heat pump ready
As we’ve said above, many of us are looking at heat pumps either now or when our combi boilers come to the end of their life. So whilst you’re looking at the flow / return temperature going around your system, maybe think about making your house heat pump ready now.
See if you can get the heating temperature down towards 40 degrees? Maybe you’ll need a few radiators replacing, maybe you won’t. But there is nothing stopping you dropping the temps down on the boiler and finding out.
Last winter I dropped my hot water down from 50 to 45 degrees and my central heating flow temperature from 75 (!!!) down to 55 degrees.
I’m hoping to reduce the heating temp down further on my combi towards 45/40 degrees this winter by replacing a couple of radiators.
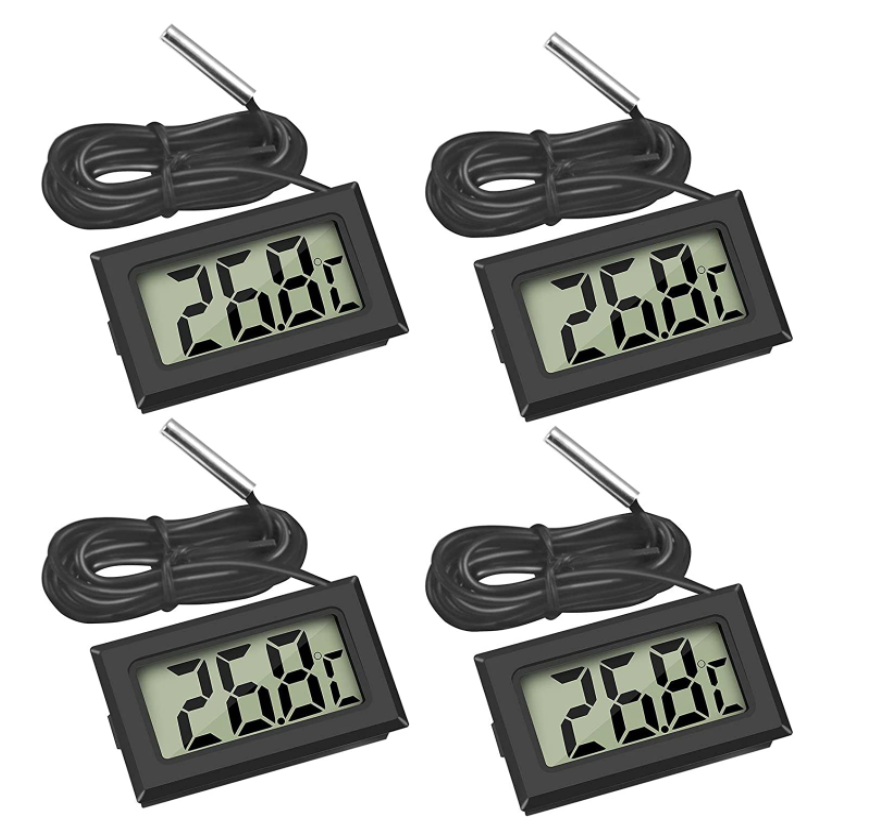
I also started monitoring the flow and return temps throughout the day. I did this by strapping simple DS18B20 sensors to the water pipes coming out of my boiler. I just wrapped some electrical tape around to hold them in place against the pipes.
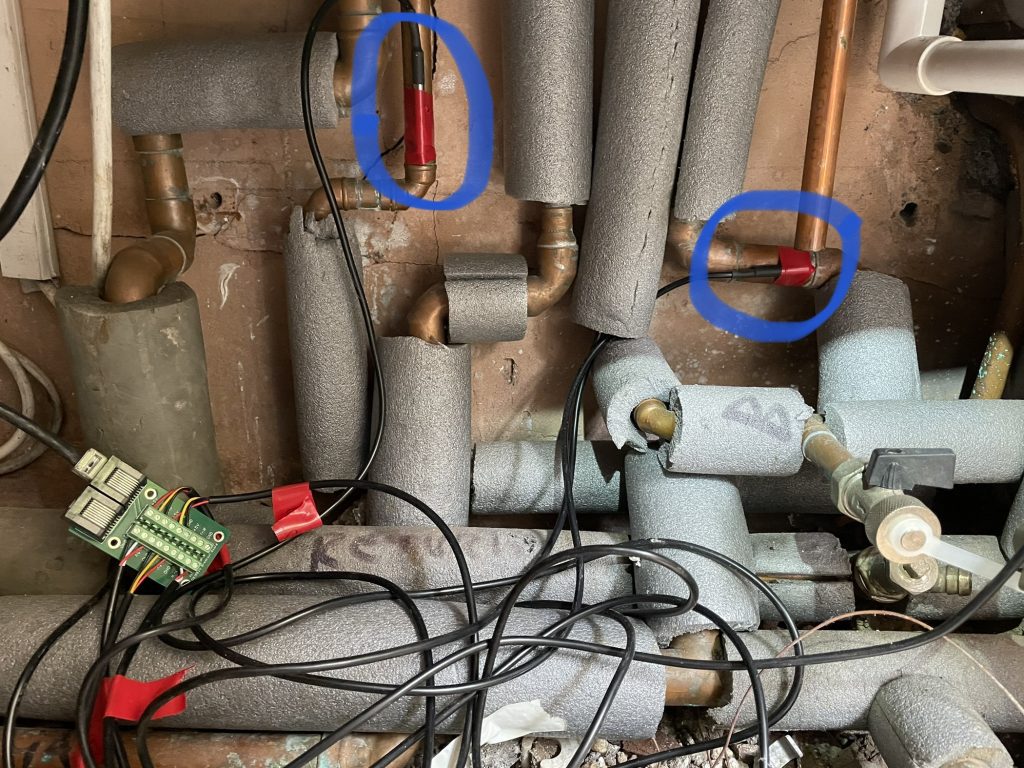
These sensors are then attached to my https://openenergymonitor.org/ emonPi using a simple connection module (bottom left of photo).
Note: I did put the insulation back on after taking the photo. And yes, it’s not a pretty spaghetti junction of pipework I’ve inherited and been left with.
PS. Having monitored room temps, thankfully the location of the combi and pipework hasn’t dropped below 17 degrees in the past year, so I’m not overly worried about the poor hot-potch insulation.
Link to sensors and connection module
https://www.sheepwalkelectronics.co.uk/product_info.php?products_id=63
https://www.sheepwalkelectronics.co.uk/product_info.php?products_id=64
Using these sensors I am now able to monitor flow and return, cold water and hot water pipes with ease and create graphs etc with all the data.
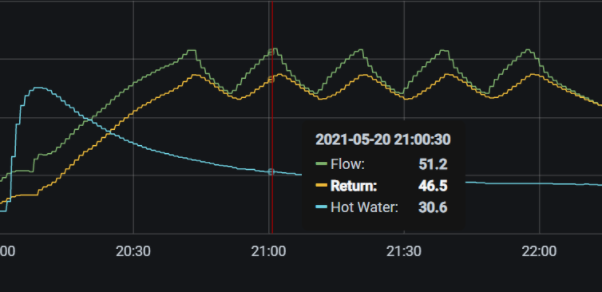
Note: As well as recording these temperature via sensors, my emonPi setup also tracks my electrical usage using CT clamps. I’ve got clamps connected to my Grid, Solar, Battery, and EV feeds. So I have detailed records of everything that is going in and out. I could also add clamps to a heat pump etc in the future.
I highly recommend you looking at an emonPi and emonTX setup if data is your thing.
If you don’t want to invest in an emonPi system, then maybe look at this cheap alternative.
https://www.amazon.co.uk/dp/B07TY6HRL4?psc=1&smid=A14BJ48KCUGWF5&ref_=chk_typ_imgToDp
Obviously you wont get any historical data, but you could see the readings live.
Hot Water temperature from the taps?
If you run the hot water tap to do the dishes and you instantly have to mix some cold water in then maybe you’ve got scope to reduce the hot water temperature?
And maybe the same with the central heating, could you drop it by 5 degrees? Give it a try, leave it a week, did anyone notice?
As stated above, I dropped our hot water from 50 degrees to 45 degrees……… no one in the house noticed!!
Obviously, these recommendations of lowering the water temperatures are for direct hot water from the combi only.
If you’re storing water in a cylinder that please take the appropriate recommendations of regularly increasing the temperature of the water to over 60 degrees by running an anti-legionella cycle.
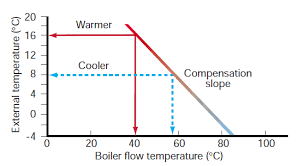
Weather Compensation
It would be worth seeing if your model of combi boiler has a weather compensation feature that could be enabled or retrofitted.
Weather compensation adjusts the flow temperatures based on the outdoor temperature.
If it’s warmer outside you can run lower flow temperatures as you don’t have much heat loss to work against.
But when it gets colder the flow temperature increases so that your radiators (or ufh) can output more heat, like our example radiator charts detailed earlier showed.
By continually adjusting the system to use the lowest amount of energy for the outdoor and indoor temperatures.
This is the same principle that most heat pump controls work on and how high COP / efficiency can be achieved.
A more comfortable heat
One big advantage of lowering central heating temps is that the heat becomes a more comfortable and gentle heat.
Yes, the rooms can take a little bit longer to warm up, but this is way better than the ‘blast on’ at 70 degrees and instant switch off.
Think of it by comparing flooring your car at 70mph for short bursts and then coming off the accelerator completely almost coming to a halt, before hammering it again. Versus gently holding the car at 50, just pootling along.
Hope you found this article useful and has got you thinking a little more critically about your own heating system.
If you find this information useful and are thinking of joining Octopus Energy, please consider using my referral code or ‘buy me a coffee’ to help support running costs of the website.
Using this referral code will gift you £50 of free credit after signup:
https://mickwall.octopus.energy
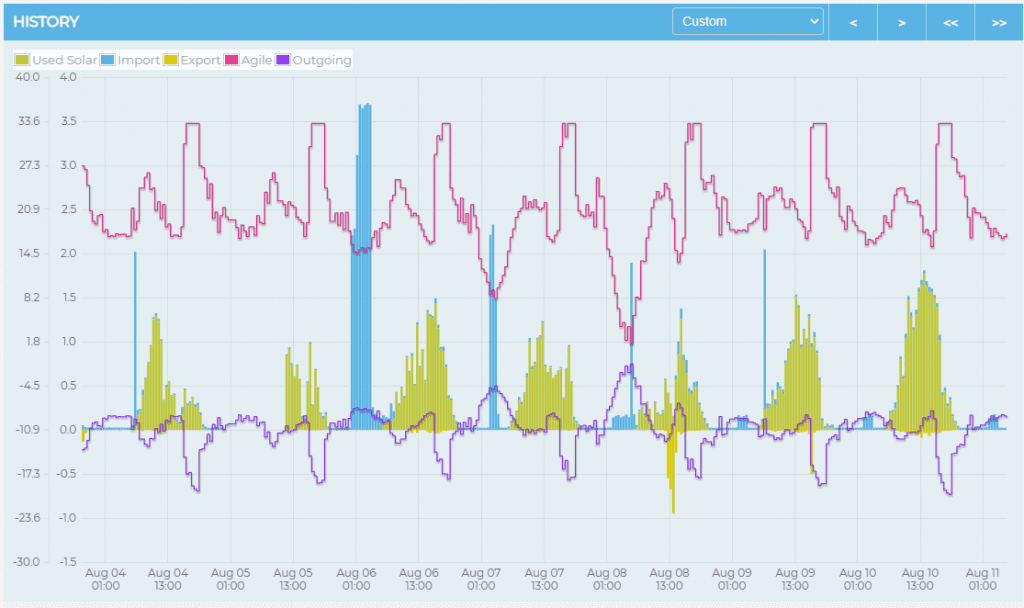
We can also be found on Twitter, please follow us @energystatsuk for daily Agile tariff pricing graphs and summaries.
Also, be sure to check out our Dashboard, Download Historical Data and OctoChargeCalc features to help you decide whether these tariffs are the right fit for you.
Note: The past performance of energy pricing is not necessarily a guide to the future.